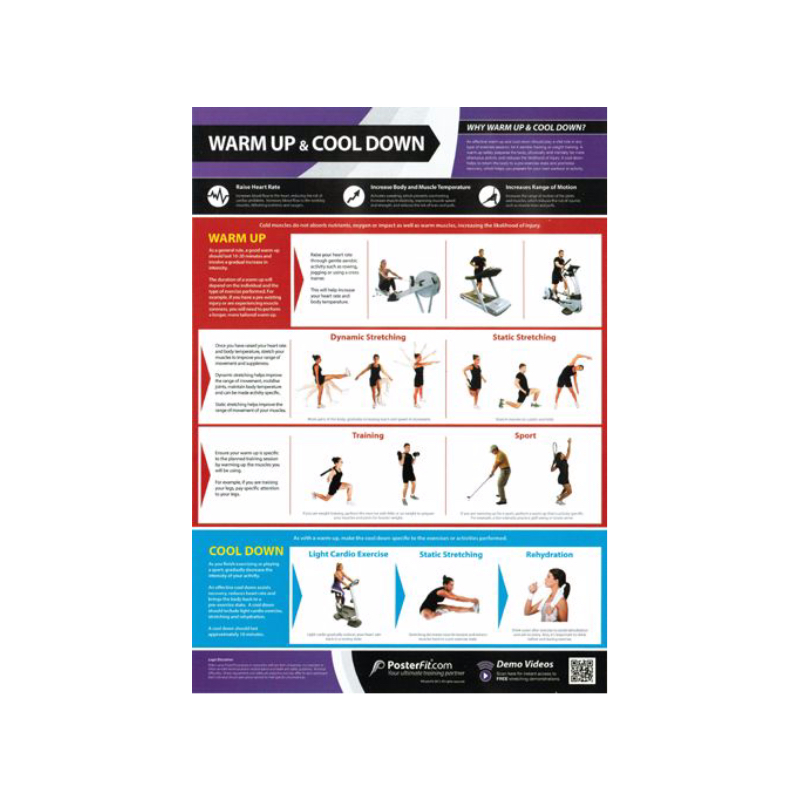
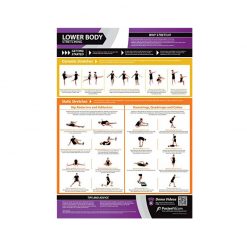
How to Debug Any WordPress Issue On Your Own

Disclosure: This post may contain affiliate links. Purchasing a product through one of these links generates a commission for us at no additional expense to you.

Debugging?

I’ll admit, this doesn’t seem like the most exciting topic, but hear me out…

What if you had complete confidence that you could fix any issues that come up with your WordPress site?

What if you had a simple step-by-step checklist that could lead you straight to the source of the error and tell you how to fix it?

Well, that’s exactly what I’ve outlined in this post.

Pro tip: bookmark or save this URL for later so you can return if any errors arise on your site.

Debugging isn’t that hard

Over the last few years, I’ve debugged thousands of WordPress sites.

While some errors are common and others are rare, there are a few simple steps that usually work to identify and fix the issue. Furthermore, unless there is an actual bug in the theme or a plugin, no code needs to be written.

In this guide, I’m going to share the debugging process I use to help customers fix their websites.  You’ll feel like a real WordPress pro after implementing this on one of your own sites.

Fixing common errors

Some of the more common issues are easy to identify and have specific solutions. I’ll cover those first and then get to the more general process that you can use for any other issues.

Are your theme settings not applying?

If you changed a plugin or theme setting and you don’t see any changes on your site, this is almost always due to caching. Most caching plugins are disabled when viewing the Customizer, so it’s common to see your changes there but not live on the site even after saving your updates.

If you have a plugin like WP Rocket, WP Super Cache, or W3 Total Cache, these plugins will cache your site’s files allowing them to load faster. Due to the caching, visitors will be sent the cached (old) versions of the files instead of the new files that contain the changes you just made.

The simple solution is to empty the cache. Regardless of what caching plugin you use, there should be a button somewhere in the dashboard you can click to empty the cache.

WP Rocket Clear Cache
WP Rocket keeps the cache clearing option handy in the toolbar

Some caching solutions can take a couple minutes, so you may need to wait a moment. Then visit your site and do a hard refresh with cmd+shift+r (ctrl+shift+r) to clear your browser’s cache as well.

Is your CSS not applying?

If you added some new CSS to your site, and your changes don’t apply, start by emptying your site’s cache. If this doesn’t work then you probably need to make your CSS more “specific.”

Check out this overview on CSS specificity guidelines to learn how you can write more dominant CSS selectors. As a quick test to check if your CSS is not specific enough, try adding an !important tag, like this:

.selector { 
  background: blue !important; 
}

If this doesn’t work, you likely have a syntax error in the CSS code. Use the finder in your browser or code editor to check if there’s an equal number of left and right curly braces. Then check for missing semi-colons, and lastly check for missing periods before class selectors.

If you do have a syntax error, all of the CSS before the syntax error will work and none of it after will.

Are you getting 404 errors?

Some themes and plugins add custom post types or make other changes that can affect your htaccess file. When deactivating one of these plugins or switching themes, you can end up with 404 errors on category pages or custom post types.

If you do have seemingly random 404 errors like this, visit the Permalinks settings page (Settings > Permalinks).

If you’ve entered a custom permalink structure, try switching to a pre-defined structure like the Post name option, and save your settings.

Save Permalinks

Save your permalink settings even if you don’t change them!

When you save the permalink settings, WordPress actually regenerates a new copy of the htaccess file. This commonly fixes the rogue 404 errors you may be experiencing.

Did the error show up after updating your theme?

While my intention is always to improve our themes, new bugs are sometimes introduced with theme updates.

If you notice a new error on your site after updating a theme, there’s an easy way to rollback to a prior version (this works for plugins too).

Install and activate the WP Rollback plugin, and you’ll be able to revert to the last version of the theme you’re using.

WP Rollback

The only thing I don’t like about this plugin is that the rollback option is hard to find. Visit the Appearance menu and click on the active theme to find the Rollback button at the bottom-right.

WP Rollback Button

After you click “Rollback,” you’ll be taken to a page that includes every version ever released of the theme.

Old Theme Versions

You can then select the version you want and click the Rollback button at the bottom to complete the process. The rollback update runs just like a regular theme update.

If you don’t remember which version you were last using, you may want to try reverting back a few versions. If you visit the Support Center, you can find changelogs for all of our themes including the date each update was released.

If reverting to an older version fixes the error, you can contact support about the bug in the theme. If it doesn’t help then you know the error wasn’t introduced by the theme, and this means it’s almost certainly coming from a plugin on the site.

Please note that WP Rollback only works for free themes (and plugins) available on wordpress.org.

Do you see the “White screen of death?”

Here’s a common scenario:

You’re editing a PHP file in your theme when suddenly the whole site goes white and you can’t even access the admin menu. This is known as a “fatal error” in PHP.

Most likely, there is a missing or extra character somewhere. All it takes is a random period or letter where it doesn’t belong in a PHP file to crash the whole site. Be careful when editing PHP files!

Here’s how to fix it:

First, download a new copy of the theme you were editing. Visit our themes and you can re-download any of them. The new copy you download will have the original, unedited files in it.

Next, connect to your site via FTP. If you’ve never used FTP, you can follow this FTP tutorial to learn how. The theme is located at the following location on your server:

wordpress/wp-content/themes

For instance, this would be the path to the Ignite theme:

wordpress/wp-content/themes/ignite

Let’s say you were editing the header.php file when the site crashed. Locate header.php in the copy of Ignite you just downloaded from our site and upload it into the “ignite” folder on your server via FTP.

Once the file is uploaded, your site will be back online. Plus, now you know how to fix your site if this happens again.

While knowing this does make it easier to edit your theme files, I would recommend you don’t ever directly edit the files in your theme. It’s much smarter to use a child theme instead.

Debugging everything else

The first few steps cover some pretty specific errors, but nearly everything else can be fixed with the next three steps.

Temporarily deactivate all plugins

If you’re not sure what’s going on with your site, this is the first thing to try.

While I can’t say our themes are always 100% bug-free, it’s often much more likely that an error on your site is coming from a plugin. This is because WordPress sites use one theme but 6-10 plugins on average.

Start by visiting the Plugins page in your dashboard. If you have a mixture of active and deactivated plugins, write down which ones you’re using or take a screenshot of the Plugins page.

Next, click the checkbox at the top of the table to select all plugins and use the bulk actions dropdown to deactivate all plugins at once.

Bulk Deactivate Plugins

I understand if you’re a bit hesitant to do this.

What’s going to happen to your site?

While your site will be temporarily affected by the deactivation of the plugins, everything will be back to normal once you reactivate them. Plugins don’t delete their settings when deactivated. That means when you reactivate a plugin, it will be restored with the exact same settings you had before.

Once the plugins are deactivated, you can check to see if the error still occurs. If the error has gone away then you know the issue was coming from one of the plugins.

Reactivate each plugin one at a time until the error returns. If it’s a plugin you don’t need you can just delete it. Otherwise, you can contact the plugin developer about the error. If it seems like a conflict with one of our themes rather than a general error in the plugin then please reach to us as well.

If this does not help, continue to the next step.

Reinstall your theme

If deactivating your plugins doesn’t work, there could be an error with the theme. The error could be due to an edit made to a theme file, a corrupted file from a bad update, or a bug in the theme.

If you have edited the theme files, make sure to save these changes as reinstalling the theme will override your edits.

To reinstall a theme, start by visiting the Appearance menu and switch to a different theme. Then when you select the theme you were using, you will see a Delete option at the bottom.

Delete Theme Button

You can’t delete your active theme which is why you must switch themes first.

Once the theme is deleted you can reinstall a fresh copy and check if the error has been fixed. If this does not help, there may be a bug in the theme.

The last thing to try is to reinstall WordPress itself.

Reinstall WordPress

As a last resort, you can try to reinstall WordPress. Believe it or not, reinstalling WordPress isn’t nearly as challenging as it sounds.

Visit your dashboard and click on the Updates sub-menu item under Dashboard.

Dashboard Updates Menu

On this page, you’ll see all of the available updates for WordPress core, your themes, and plugins. If you’re not on the latest version of WordPress you’ll see an update button as well. Otherwise, you’ll just see the Re-install Now button. Click this button and WordPress will automatically re-install itself for you.

Re-install WordPress

Hopefully, this will resolve the error for you. If not, then it’s time to contact a developer for help.

Conclusion

This debugging process works for close to all of the support requests I receive. At times, more technical expertise is required, but the steps here don’t require any coding or programming knowledge. You just need a little debugging know-how and WordPress savvy.

If you’re having issues with your site and this guide hasn’t helped, you can visit the Support Center and select your theme there to find the best ways to get in touch with us for assistance.

Ben Sibley
Ben Sibley
Ben Sibley is a WordPress theme designer & developer, and founder of Compete Themes.