
Disclosure: This post may contain affiliate links. Purchasing a product through one of these links generates a commission for us at no additional expense to you.
Let’s play a game…
Every file on your site contributes to the overall “page weight” in terms of kb/mb. How much of your page weight do you think comes from images?
10%?
20%?
According to the HTTP Archive, images make up 50% of the average site’s page weight (about 800kb).
Since half of the data visitors need to download when they view your site comes from images, any optimization you make here can have a huge impact on your site’s performance.
In fact, if your images aren’t optimized at all, you’ll be able to reduce your image weight by 50-80% following this guide.
Three ways to optimize images
When it comes to image optimization, there are three simple techniques.
The first and most effective way to optimize your images is to compress them.
Click here to try out ShortPixel for yourself
1. Compress your images
Image compression is the primary means of optimizing graphics. If you followed the WP Rocket optimization guide then you’ll be familiar with the minification concept introduced there. Image compression is not so different.
When compressing an image, an algorithm basically rewrites the code in the image to reduce the total file size. There are two main types of compression.
Lossless compression
Lossless compression optimizes your images while retaining the exact same pixel-for-pixel display. There’s no reason to skip lossless compression because it reduces the file size while making literally no visual difference.
That said, I recommended you use lossy compression instead.
Lossy compression
Lossy compression offers much greater optimization but at the expense of some minor degradation of quality. However, that loss in quality is so minor it’s often imperceptible.
Lossless compression is important for medical imaging and technical drawings, but for images displayed on a website, lossy easily meets our quality standards.
How to compress your images
I’m going to recommend the ShortPixel plugin for image optimization which I use here at Compete Themes. It includes lossy and lossless compression plus “glossy” compression which is sort of an in-between option.
ShortPixel will automatically compress images as you upload them to your site which can be really convenient. I’m rather impatient while editing, so I prefer to turn this option off and optimize the images from the Media menu later.
You can use a tool like TinyPNG to compress your images, but I find it easier to upload the images to my site like always and then optimize them with ShortPixel.
What about images you already uploaded?
This is where ShortPixel really excels.
If you use a tool like TinyPNG to optimize your images, you’re only going to optimize the new images you upload to your site. What about all of the images you’ve already uploaded? How do you optimize them?
ShortPixel has an awesome bulk optimization option that will run through all of your images at once.
The picture above is pretty self-explanatory except for the “smaller thumbnails” part. Why are there 4x as many smaller thumbnails and what even are they?
Optimize all image sizes
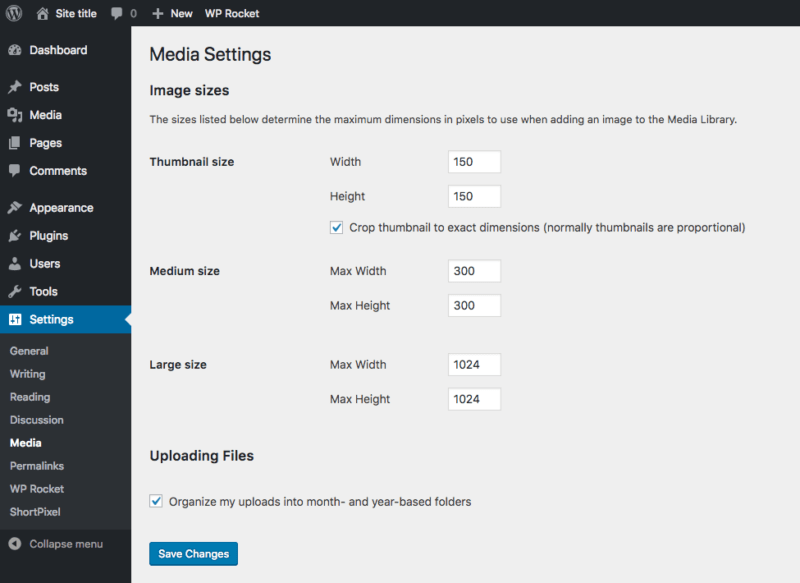
You may not know this, but whenever you upload an image to WordPress it automatically creates three additional sizes (if the image is big enough):
- Thumbnail
- Medium
- Large
You can view and edit the dimensions of these image sizes from the Settings > Media menu.
Here’s the issue…
Let’s say you compress an image and then upload it to your site. The “full” version is fully optimized, but the three additional sizes are not. If you insert the “medium” version of the image into a post, that image is uncompressed. ShortPixel will optimize the original images you uploaded and all of the additional sizes WordPress creates.
You’ll get an awesome performance boost from compression alone, but there are two more simple ways to further optimize images on your site.
2. Resize your images
Let’s say you upload an image that is 5,000 x 2,500px to your site. You then insert it into a post where it displays at 800 x 400px. Despite the fact that the image is only 800px wide on the visitor’s screen, they still have to download the 5,000px version.
Needless to say, an image that is 5,000px wide is massive and will likely take longer to load than every other file on your site combined.
There are two ways to avoid this.
Upload smaller images
As a general rule of thumb, don’t upload any images larger than 2,000px wide. Whether you use Windows or Mac, you have a simple image editor you can use to quickly resize images that are too large before uploading them.
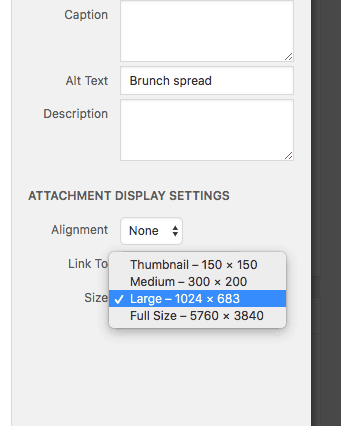
Another tip is to avoid the “full” version when inserting an oversized image into a post. Choose the “Large” size instead which is 1024px by default.
Resize images in your Media Library
It’s easy to resize images before you upload them, but what about the ones already on your site?
ShortPixel has a setting that allows you to set a maximum width and height for your images.
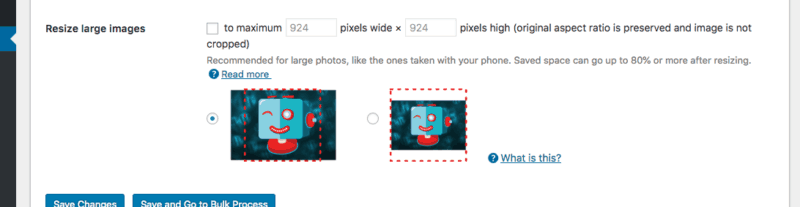
You can set this option so that the images are never cropped when they’re resized. Once you’ve turned this setting on, you can run the bulk optimizer and ShortPixel will resize any overly-large images it encounters. It will also resize new images as you upload them.
If you’ve been using a lot of large images then this might be the most beneficial step for your site. There’s just one more optimization technique and it’s the easiest yet.
3. Remove EXIF Data
Image files can contain additional data not displayed in the image itself called the EXIF data. The EXIF can be pretty useful and includes info like the camera manufacturer, date and time the photo was taken, and even the GPS coordinates.
You don’t need this data attached to the pictures you post on your site. Not to mention, it’s probably best for privacy reasons that your photos don’t include GPS coordinates!
Once again, ShortPixel handles this easily for us. There is a setting turned on by default that strips the EXIF data from all images during the optimization process.
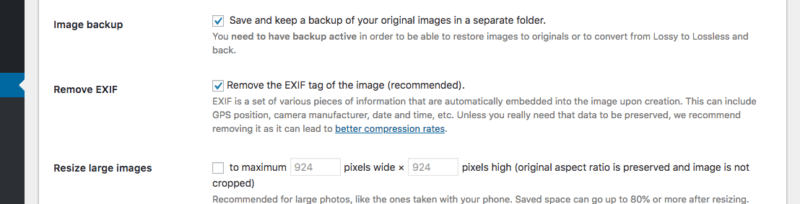
On average, this leads to an additional 8.5% reduction in file size.
Smaller images = faster sites
If you haven’t optimized your images at all, this is going to be an awesome day for your site!
Everyone talks about hosting and file optimizations, but for some reason, image optimization often gets neglected. That’s crazy because there are huge gains to be had.
I use ShortPixel to handle all of the image optimization practices outlined in this guide and recommend it for anyone else who cares about the performance of their WordPress site.
Click here to try ShortPixel now
Now that you’re on your way to a super-optimized media library, you might want to consider a premium host like WP Engine to load those images even faster. And you should take a look at the WP Rocket guide especially the part about lazy loading for further image optimization.
